Showing posts with label Die Cuts. Show all posts

Saturday, 30 November 2024

Yellow & Gold


Beccy's Place runs a month of Holiday Cards challenge throughout November. Most days are a prompt with the letter of the alphabet but as there are only 26 then we get a random prompt too.


The prompt for Day 28 is Y - My card is Y for Yellow

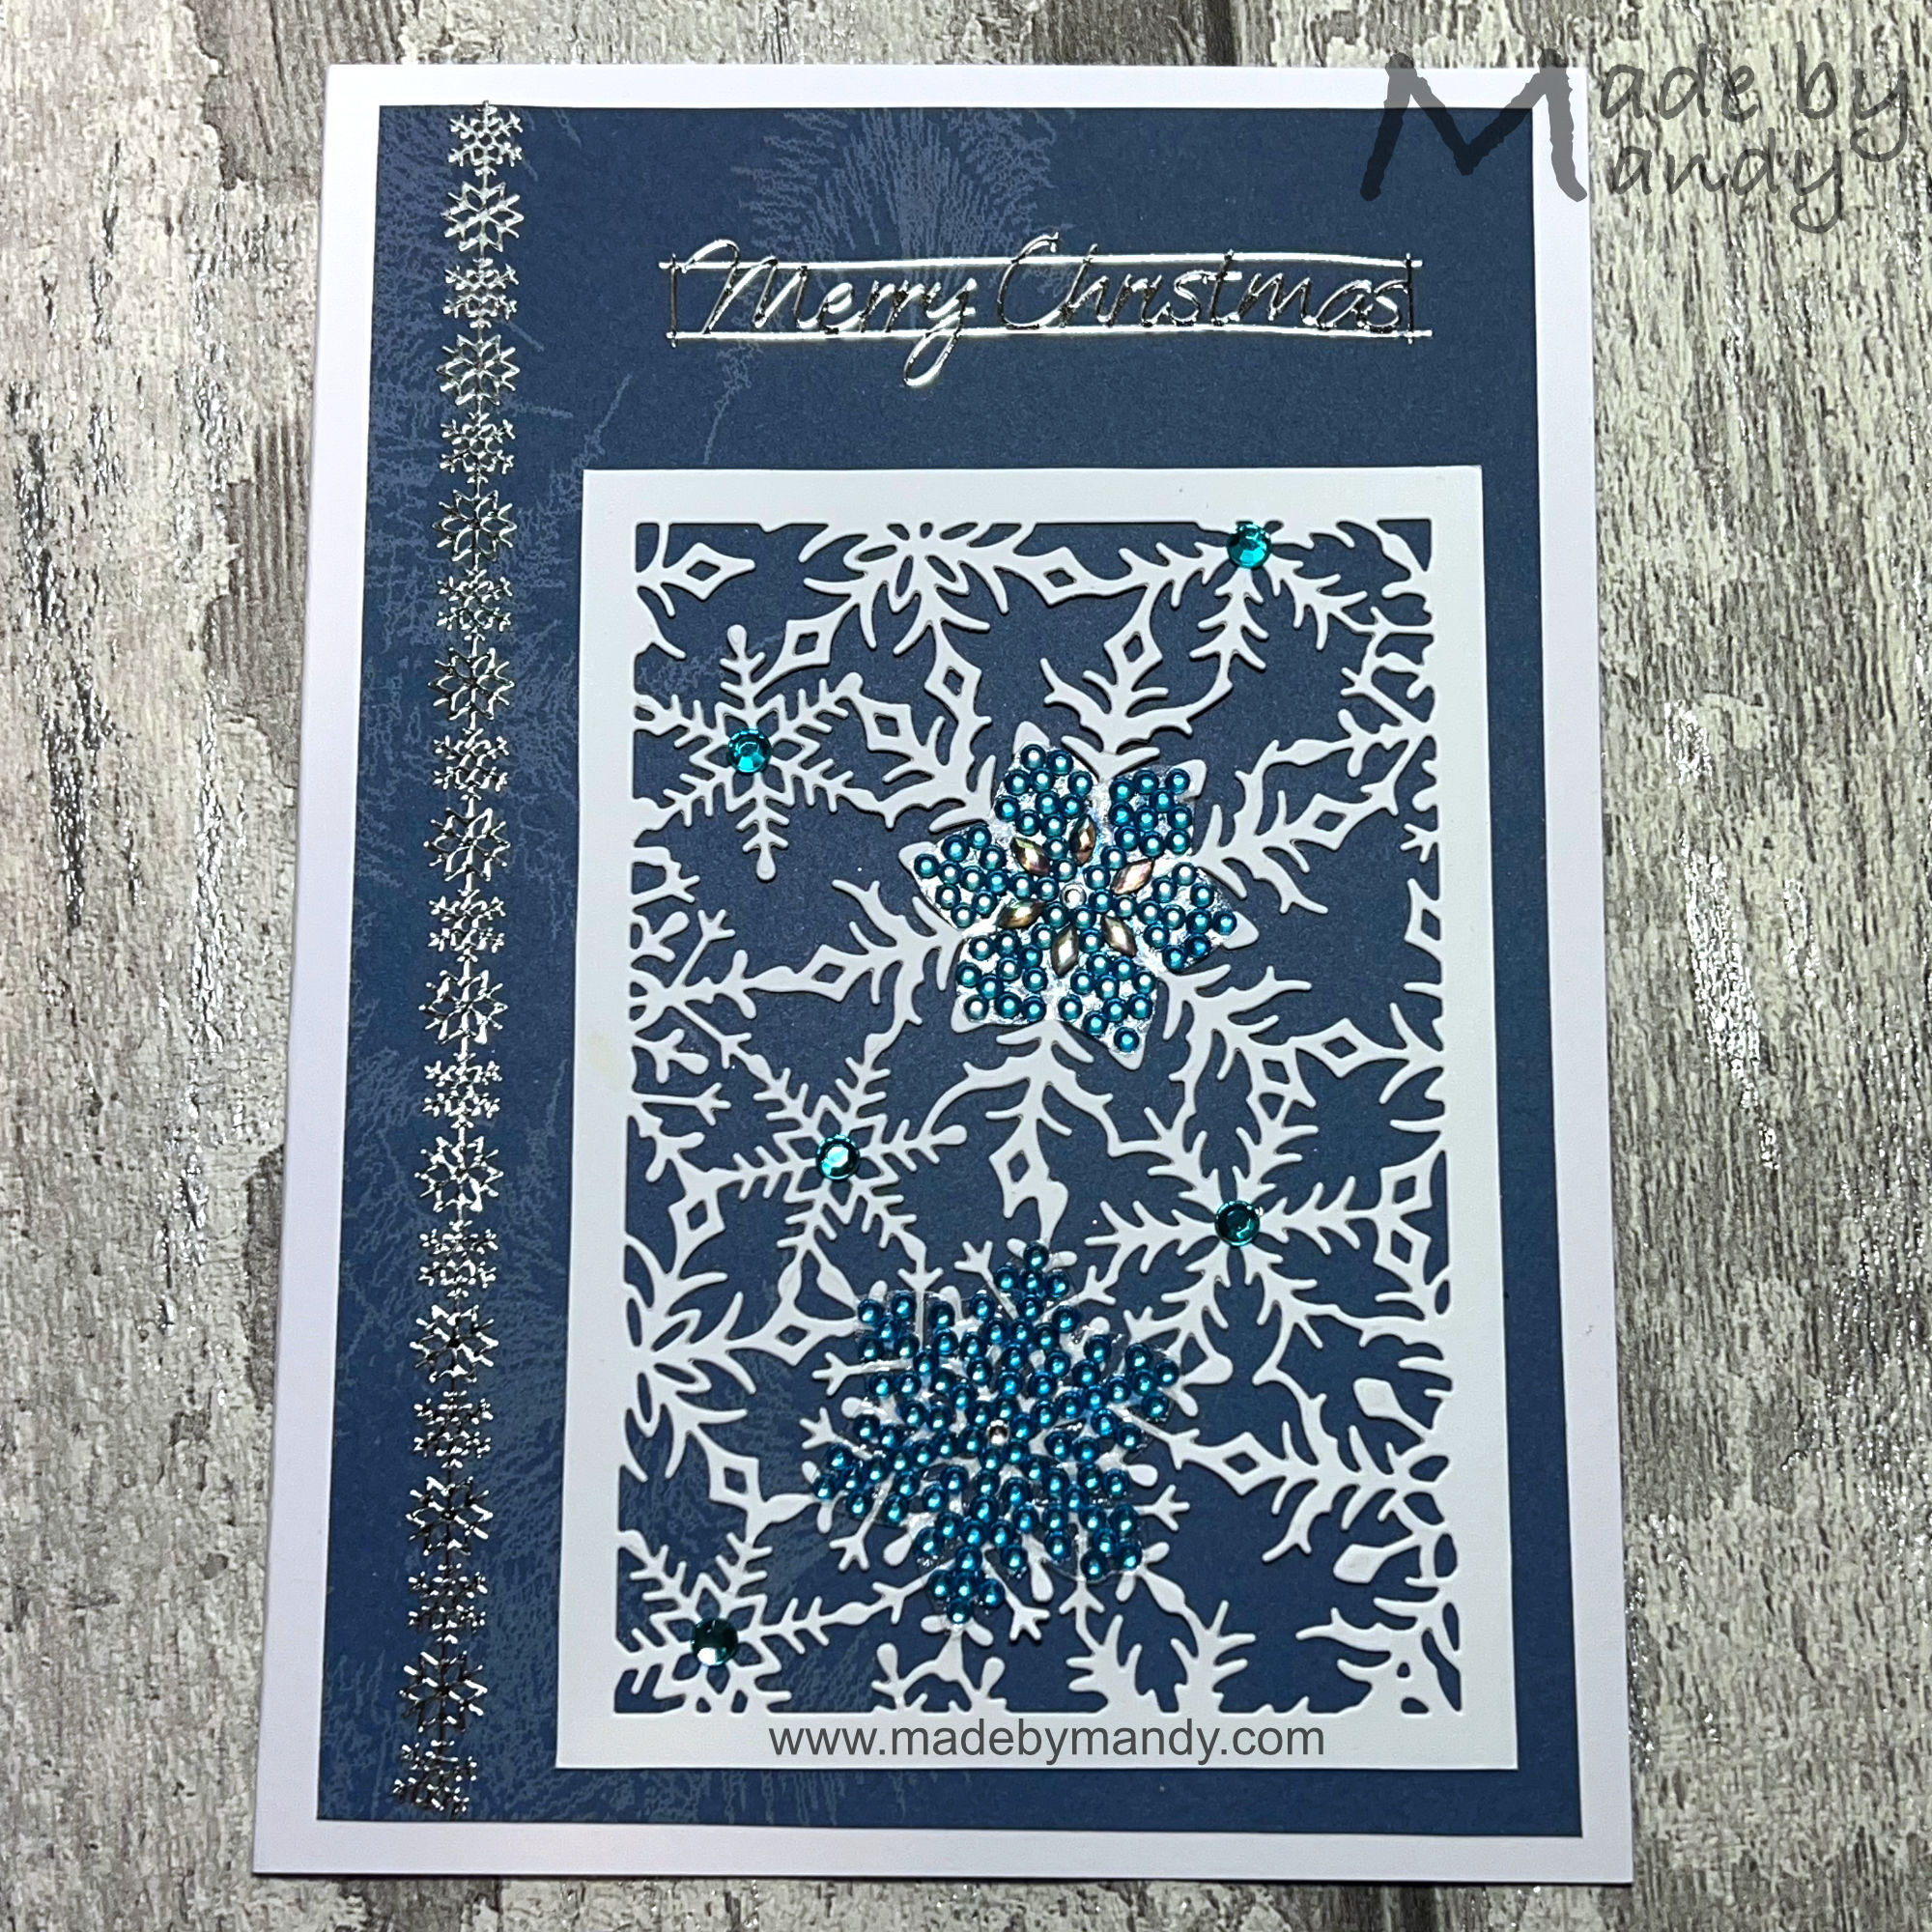
This is another 8" card made with one of the largest diamond painting stickers and some of the small stars as accents.

I covered the base with the reverse of one of the papers from the Winter Berries pad which was a free gift from the Birthday event at Crafter's Companion Evesham store last month. Considering it still retails at £15 it was a fabulous bargain. I added a thin gold peel off border to edge the card.

The main focal image is so large I didn't want to over embellish the card so I used some of the small stars from the kit and added a die cut sentiment created with 2 different gold cards. The lower part is just a scrap of plain gold, the upper layer with the outline is a sparkly gold scrap.

Card Details -


Size - 8” Square 

Image - Christmas Wall Art Stickers (Craft Buddy)

Dies - Merry Christmas (Crafter’s Companion)

Designer Paper - Winter Berries 12” (Crafter’s Companion)

Embellishments - Gold peel off border sticker


I would like to enter this card into the following challenges (in Alphabetical Order)

Beccy’s Place Challenges - Month of Holiday Cards Day 28 - Y is for Yellow

Monday, 25 November 2024

Merry Christmas


Beccy's Place runs a month of Holiday Cards challenge throughout November. Most days are a prompt with the letter of the alphabet but as there are only 26 then we get a random prompt too.


The prompt for day 23 is Black & White plus one colour

In my box of recycled elements from old Christmas cards was a fabulous panel of red metallic card with a big glittered sentiment that was just too good to throw away so I made that the basis of this card.

I covered the 8" card base with black card. This I felt was the perfect background for the largest of the dies from the Holly Frames set by Chloe's Creative Cards. I cut this from white glitter card to co-ordinate with the glitter sentiment.

The card panel I trimmed to size and rounded the corners off with my 3 in 1 punch from Crafters Companion. They are a relatively new release and I do think it is funny how 'old' stuff that I have used for years and years is all of a sudden a 'new' thing. To be fair it is much stronger than my old corner rounder and does have the added advantage it cuts 3 different sizes of rounded corners so is an improvement on my old one.

After sticking the panel to the card I then added some stitching to the holly leaves with a very fine tipped pen and lots of gem holly berries.

Card Details -


Size - 8” Square

Image - Recycled from a shop bought card

Dies - Holly Square (Chloe’s Creative Cards)

Punch - Rounded 3 in 1 (Crafter’s Companion)

Colouring Medium - 0.1mm fine liner (Sakura)

Embellishments - self adhesive gems


I would like to enter this card into the following challenges (in Alphabetical Order)


Beccy’s Place Challenges - Month of Holiday Cards Day 23 - Black & White plus 1 colour

Saturday, 23 November 2024

Jolly Snowman


Beccy's Place runs a month of Holiday Cards challenge throughout November. Most days are a prompt with the letter of the alphabet but as there are only 26 then we get a random prompt too.


The prompt for Day 21 is S - My card is S for Snowman

I have to be honest and say I am super proud of this card as there is so much 'white space'

The base of the card is covered with a gold metallic paper. The patterned paper is part of the same sheet I used to make my Noel card. I love the bokeh in the background which was a just enough pattern that complimented the diamond painting snowman. As the presents are in warm colours it was actually quite hard to marry it up to a nice paper (and I have a lot of paper to choose from)

The sentiment is a 2 part die from Crafter's Companion. I love the bold, modern design that mixes the 2 fonts together. The bottom layer is cut from a shiner, darker gold and the top layer is from the same background gold.

I saw a tip on Youtube from another crafter that when you are sticking down intricate dies you use a plain brayer to roller a thin layer of glue evenly on the die. I bought a set of 3 different sizes from Amazon and tried it for the first time on this die and OMG what an absolute game changer. No more spidery thin trails of glue in all the wrong places! It made it so much cleaner and easier to stick the 2 layers together and also onto the main card. If you have this same problem I would highly recommend you give it a go too.

If you know me well S is usually a snowflake or Snowman and this year is very special as we have had snow for the last few days. I desperately wanted to build a snowman but a girl's gotta work so no chance unfortunately.

Card Details -


Size - 6” Square

Image - Diamond Painting Sticker (Craft Buddy)

Dies - Let it Snow (Crafter’s Companion)

Designer Papers - Merry Christmas Icy (Craft Sensations)


I would like to enter this card into the following challenges (in Alphabetical Order)


Beccy’s Place Challenges - Month of Holiday Cards Day 21 - S is for Snowman

Wednesday, 20 November 2024

Q is for Quote


Beccy's Place runs a month of Holiday Cards challenge throughout November. Most days are a prompt with the letter of the alphabet but as there are only 26 then we get a random prompt too.


The prompt for Day 19 is Q - My card is Q for Quote

This is another card made using recent acquisitions. The starting point was this large quote which I recycled form an old card. It measures 6" so is a large focal point for this 8" card. 

I covered the card with one of the papers from my bargain Winterberry Collection kit from Crafter's Companion. 

I used one of the frames from the Holly Square die used on my Jingle Bells card. There are 5 frames of different sizes plus a holly cluster die. I have been very impressed with how clean the cut is from them considering how intricate they are. This frame cuts out a tiny holly leaf so I added some loose green glitter to provide a contrast with the darker green frame. I added a border pf green gel pen to match the gold mat.

Lots of red and clear gems were added for sparkle and a diamond painted poinsettia sticker in the top corner.

Card Details -


Size - 8” Square

Image - Diamond Painting Sticker (Craft Buddy)

Dies - Holly Square (Chloe’s Creative Cards)

Designer Paper - Winterberry Collection (Crafter’s Companion)

Colouring Medium - Gold Gel Pen

Embellishments - Red & clear self adhesive gems, Green loose glitter


I would like to enter this card into the following challenges (in Alphabetical Order)


Beccy’s Place Challenges - Month of Holiday Cards Day 19 - Q is for Quote

Thursday, 7 November 2024

Decadent Die Cut Snowflakes


This card has been made using a very detailed die Decadent Snowflakes from Crafter's Companion.

This is an A5 card and the panel is quite large. I used some very subtle snowflake paper which is in the corners so this I  felt worked well with the die cut panel. I added some of my Diamond Painting snowflakes to the largest ones and some small self adhesive gems to the centres of the others.

Finally I added a silver snowflake border and sentiment.

I love the blue & white colour combo to create 'icy' Christmas cards.


Card Details -


Size - A5

Dies - Decadent Snowflakes (Crafter’s Companion)

Designer Paper - Merry Christmas (Craft Sensations)

Embellishments - Diamond Painting Wall Art Stickers (Craft Buddy), Peel Off stickers, self adhesive gems


I would like to enter this card into the following challenges (in Alphabetical Order) 

Beccy’s Place Challenges - Month of Holiday Cards Day 4 - D is for Die Cut & Diamond Painting

Monday, 4 November 2024

Winter Wishes Snowman


At Kate Hadfield Designs there are so many fabulous sets it is really easy to get inspired to use them. There are digital stamps which you can colour, coloured versions you can scrapbook or make into digital layouts. Papers, patterned overlays and doodles galore. No matter what your skill level there are so many goodies to play with.


One of the most fabulous things about being in this Creative Team is that we have free rein to make anything we want to using the sets in the shop. This is amazing for inspiring creativity as there are so many amazing packs to play with. I feel very, very lucky to be able to have this opportunity.


Kate is really generous with her freebies which are readily available. If you sign up to the newsletter you get access to an extra subscriber area the Doodle Den where there are loads more freebies. There is a gallery full of projects by the Creative Team and customers and so much inspiration for crafters and teachers. I would highly recommend you pop over there and join in the fun.

This card has been made with the Winter Wishes freebie. This has some pre-coloured images and this lovely snowman comes with or without the scarf. Earlier in the year I purchased the Gemini II die cutting machine from Crafter's Companion. I had seen it demonstrated at the Evesham store and was impressed with how much quieter it was. They really dropped the price for 24 hours and it 'fell' in my basket.

The die cut snowflake frame was the first thing I cut on mine as it is so intricate I knew it would be a good test for it. My previous Gemini would have struggled to cut this in a single pass, it would have been at least 2 times I had to run it through and even then it would miss certain areas. This was a much, much better cut and I am glad I upgraded to this machine.

The card base is covered with a beautiful snowflake paper and I also used this as a layer behind Mr Snowman. I added some sparkly gems to the snowflakes and the sentiment has been recycled from an old shop bought card.

Card Details -


Size - 5” x 7”

Pre-coloured Digital Image - Winter Wishes Freebie (Kate Hadfield Designs)

Die - Shimmering Snowflakes (Crafter’s Companion)

Designer Paper - Merry Christmas (Craft Sensations)

Embellishments - Gems


I would like to enter this card into the following challenges (in Alphabetical Order)


Beccy’s Place Challenges - Month of Holiday Cards Day 2 - B is for Blue & Bling

Friday, 1 November 2024

A is for Acetate


Beccy's Place runs a month of Holiday Cards challenge throughout November. Most days are a prompt with the letter of the alphabet but as there are only 26 then we get a random prompt too.


Beccy is so very generous giving out so many amazing prizes and visiting every single entrant during the month and there are over 1000! I was unable to enter at all last year as I was so busy with a 2nd job that my card making completely went by the wayside. So much so it was the middle of November before I realised that I had missed the challenge! It was a good job I had made a lot of my Christmas cards earlier in the year as there would not have been any handmade ones given out last year.

Anyhoo, I am still mega busy but I am trying very hard to participate this year as thee are my favourite cards to make.

This card is for the Letter A which is for ACETATE

I visited the Crafter's Companion store in Evesham earlier in the year and they often have some amazing bargains. Many are kits that have been sold to QVC customers and returned so the staff check them for completeness and sell off at a much cheaper price.

This majority of this card is made using items from the Winterberry Collection which retails for £50 but I bought for only £10!!!! It has 580 elements in it and was a complete bargain.


The centrepiece is a Diamond Painting (DP) sticker from a kit by Craft Buddy. I have to admit I was a bit reluctant to get involved with DP as I wasn't really keen on the idea of using little dots of plastic but was intrigued enough to have a go and I love it. This particular kit has loads of traditional Christmas images in it, some much larger than others. I took it on holiday to Anglesey earlier in the year and it was a lovely indoor activity when the wet and windy weather descended.

Once completed you seal the images with a special glue that prevents them from falling off but still retains the sparkle on the gems.

The sticker is on a clear acetate background which I trimmed more closely to the pattern. I used a circle of black card and added the white patterned acetate over it, being careful to add the glue under the sticker. This was then matted on red shimmer card from the Winterberry kit. The lovely paper, card blank and die cut sentiment are also from the same kit.

Thank you to Becky for running this challenge and your amazing generosity.

Card Details -


Size - 6” Square

Image - Diamond Painting Christmas Wall Art Sticker (Craft Buddy)

Die Cut, Acetate & Paper - Winterberry Collection (Crafter’s Companion)


I would like to enter this card into the following challenges (in Alphabetical Order)


Beccy’s Place Challenges - Month of Holiday Cards Day 1 - A is for Acetate

Saturday, 6 April 2024

Celebrate With Cake


This year I am trying to make a concerted effort to use my stash rather than collect it.

I have been making cards for at least 25 years now and in that time I have amassed a lot of supplies. Over the last few years I have tried not to buy too many new items, glue and consumables of course have been the exception from this.

So in an attempt to actually USE my dies and embossing folders especially I have pulled out not one, but 2 dies that I have not used before.... Go me!

When I saw the current sketch from Atlantic Hearts Sketch Challenge I had already decided to use the sentiment die to make a birthday card for a neighbour. I had the perfect piece of paper in my stash to suit the background so the sketch was a brilliant starting point for this card.


The image was cut from white card and coloured with a combination of Promarkers, fine liners and a Spectrum Noir glitter marker.

This was then mounted onto black card cut with the scalloped outline die and popped up on 3D foam for dimension.

A sheet of card was used for the base and I added some cardstock which was in my coloured scraps file. It came in a mixed bag of scraps from Craftwork Cards years ago and was 8' square so I was really pleased to use it after so many years. Each colour is embossed with different textures.

The small butterflies have been cut using a Martha Stewart punch. I love how detailed it is despite being small in size. I cut the bottom layer from scraps of a green paper. The top layers were cut from scraps of a striped paper from DCWV which I lined up so that it would be symmetrical on each wing. These butterflies are stuck down in the centre and the top layer wings folded up.


The large green butterfly was cut from a perfume box that I saved as it has a really sumptuous flocked texture and was far to nice to throw away. This particular die has an outline that is attached to the main butterfly and you can stick it down and leave the wings flapping.

I have found some amazing tools called Teeny Tiny Dauber Sticks which I bought from Hunky Dory Crafts. You get loads in a pack and you can wash them to re-use. They are perfect for gluing very fine detailed dies and I am really pleased I have tried them. (I am not affiliated in any way, just a very happy customer)


Finally I have added some small gems to the body of the butterflies and some star gems dotted around the card.

Card Details -


Size - A5

Dies - Celebrate With Cake (Crafter’s Companion), Kaleidoscope of Butterflies (Crafter’s Companion)

Punch - Butterfly Stamp & Punch Set (Martha Stewart)

Colouring Medium - Promarkers, Fine liners, Spectrum Noir glitter marker

Designer Paper - Embossed card from Craftwork Cards, Butterflies The Glitter Stack (DCWV)

Embellishments - Self adhesive Gems


I would like to enter this card into the following challenges (in Alphabetical Order)