Showing posts with label Rubber Stamps. Show all posts

Thursday, 1 December 2022

The Nativity


I am frantically catching up on my posts for the challenge for Beccy's Place Month of Holiday Cards.
Day 16 the prompt is the letter N. Mine is Nativity and Noel 

The card has been made with a rubber stamp image from a swap years ago on a forum I used to belong to. I have no idea who the designer is but I suspect it could be Penny Black. It was coloured with Twinkling H20's so has a lovely shimmer to it. This was in my little packet of prepared images but not previously made into a card.

The tag was a decoupage one by Margaret Sherry that came in a magazine freebie goodness knows how many years I have had it languishing in my stash.

I found a paper in my stash with a blue backgrounds and stars which I felt tied the elements together. I added gold shimmer card for the matting layer and of star gems for twinkle.

I tend not to use religious iconography as I am agnostic but felt it made a nice Christmas card for a family I know are church goers and will appreciate the thought.

Card Details -


Size - A5

Rubber Stamp Image - Unknown

Colouring Medium - Twinkling H20’s

Embellishments - Star Gems, Gold Twine, Decoupage Tag (Margaret Sherry)


I would like to enter this card into the following challenge


Wednesday, 7 September 2022

Frozen Fellowship


It's time for another challenge over at The Paper Funday.
Our challenges are alway Anything Goes with an optional twist.
The twist this time is 'Thinking of You'


We are very fortunate to have 2 sponsors for each challenge this year which means we get to choose which artist we would like to work with. This is really great as it gives us double the choice. We are very lucky with the amazing sponsors that are lined up this year, many of which are old favourites and some that are new to me.

We are sponsored this month by Newton’s Nook Designs and QKR Stampede both of which I have created with before.

For this challenge I used this super rubber stamp set Frozen Fellowship from  Newton’s Nook Designs. I won a chalenge some time ago and the prize was a gift card so party of my winnings went on this. I do love a snowman and had nothing like this with lots of snowmen and instantly fell in love when I saw it. It had not previously been inked so it was the perfect reason to get my stamping platform out.


I used one of the sentiments from the set and thought it would be fun to isolate just one of the snowmen and make that my favourite. I have never done the spotlight technique before. I used a heart shape frame die as a template and drew around it using a blue pencil. I then coloured the snowman with my pencils in blue to match the paper. Fastest colouring on an image ever I think....

The white card base has some Glittering Snowflakes Vellum from Crafter's Companion. This is a really thick vellum which is very forgiving when you stick it down as it doesn't show through.

The die is Regal Snowflake from Crafter's Companion and is a recent purchase. I have quite a few snowflakes in my collection and really don't NEED any more but I loved how detailed and intricate it is so it kinda fell in my basket

I matted the sentiment and image using some scraps of blue card and then the final touch was using some gems to embellish the snowflake and add eyes to Mr Snowman. This will be the card I give to my hubby at Christmas so look at me being so far ahead. 

I hope you will join myself and our fabulous Team over at


Card Details -


Size - A5

Rubber Stamp Image & Sentiment - Frozen Fellowship (Newton’s Nook Designs)

Colouring Medium - Arteza Expert Pencils

Dies - Regal Snowflake (Crafter’s Companion), Heart Framelits (Sizzix)

Designer Paper - Glittering Snowflakes Vellum (Crafter’s Companion)

Embellishments - Self adhesive gems (The Works)


I would like to enter this card into the following challenges (in Alphabetical Order)


Monday, 1 November 2021

Angel Prayers


Today is the first day of Beccy's Place Month of Holiday Cards Challenge. This is the 9th year she has been running it and the 3rd year that I have taken part. I work part time now so many not get chance to take part every day but I will do my best as I love making Christmas cards and it is so much fun to take part in this fabulous challenge.

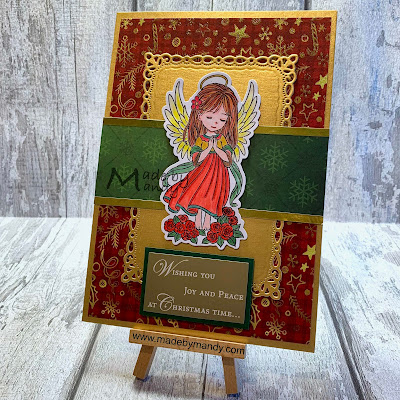
The prompt for Day 1 is the letter A. I have chosen Angel and made my card with a rubber stamp & die set by Conie Fong that came in the 16th Birthday Event lucky bag from Crafter's Companion that I received last Friday. It must be some sort of record for me to use a new item within only a few days of receiving it! Although it is not specifically a Christmas image I thought it work well in a Christmas card.

I stamped the image with Memento ink using my stamping platform. I have never been truly happy with my stamping but by golly has that changed since I got my stamping platform. The results are so much better. I can use less pressure and lighter inking as I can repeat ink in the exact same place without ruining the image. It has been the single most thing that has improved my stamping and I now actually enjoy doing it again.

The image has been coloured with my Arteza Expert pencils and I added a little clear Sakura clear glitter pen to the roses and wings. The stamps come with dies to cut out the outline. It is the first time I have used a set like that and as long as you are careful lining it up and tape in place before cutting you get an even white border around the image. I added some thin foam pads to the back and placed to one side to make the card.


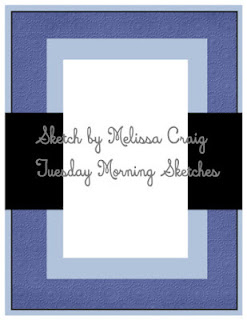
I chose the latest sketch from Tuesday Morning Sketches for the layout. A sheet of gold card was used as the background and I used the same card to cut a mat from a Romantic Rectangles die. The red and gold paper has got loads of glitter on the patterns which has a slight green tinge to it. I used a scrap of green snowflake paper and added some gold peel off border stickers to it. Finally the sentiment has been recycled from an old store bought card I received and layered onto a scrap of plain green card.

Card Details -


Size - A5

Rubber Stamped Image - Angel Prayers (Conie Fong by Crafter’s Companion)

Dies - Outline die to match the stamped image & Romantic Rectangles (Spellbinders)

Papers - Merry Christmas Traditional (Craft Sensations) & Traditional Christmas (The Works)

Colouring Medium - Promarkers, Arteza Expert Pencils,

Embellishments - Sakura clear glitter pen


I would like to enter this card into the following challenges (in Alphabetical Order)


Thursday, 18 February 2021

Happy Birthday Tag


One thing that I very rarely make is tags. I have all the wonderful ideas about making matching tag to go with a card but very rarely do I do it.

However Imagine That Digistamp is currently celebrating their 8th birthday and Kris is having some extra weekly birthday themed challenges to celebrate. If you take part you get a specially created set so it is definitely worth participating.

The prompt this week is to create a tag with a birthday theme. It was a so and so to photograph as it was either too bright and the light shone one the gold card, or not bright enough and you couldn't see the twinkle in the paint. I hate not being able to take photos in natural light but the days are very dull here at the moment.

This tag has been made using lots of offcuts that have been recycled from shop bought cards. The centre image is a very old rubber stamp from Penny Black called Spring Air. It has been stamped onto some scrap white card and coloured with Promarkers and H20's were added to the top for shimmer. This was coloured many years ago. I have a folder with lots of images that I coloured but they have not been made into anything so it is nice to get this little cutie out. The hedgehog is sniffing the air above his head. When I fussy cut around it it looked weird so I cut the air off and decided it would look cute with little butterflies instead.

The pink circles have been cut with some generic stitched circle dies from scraps of card that have been recycled from the inside of shop bought cards. Quite often there is an insert and the card has got some good quality coloured or even patterned cards that can be used for crafting. I sandwiched a scrap of gold ribbon between the pink and a circle of white card on the back of the tag.

The Happy Birthday die is from Spellbinders. I had already cut it out of some gold textured card in the past but not used it so added the red heart stickers, the stamped image and a couple of little butterfly stickers that are some of the most used stickers I have had in my collection. They are so small and in many colours so compliment a lot of colour schemes and projects.


Tag Details -


Size - 4”

Rubber Stamp Image - Spring Air 3346F (Penny Black)

Dies - Happy Birthday with numbers (Spellbinders) Circle Nesting Dies (unbranded from Ebay)

Colouring Medium - Promarkers & H20’s

Embellishments - Glittery butterfly stickers, heart peel off stickers, gold lurex ribbon


I would like to enter this card into the following challenges (in Alphabetical Order)

Wednesday, 10 February 2021

Kit Kite Valentine


Today I am sharing with you the valentine's card I have made for my hubby.


There is a great offer on in the store of 30% off a purchase of 3 items or more so I would encourage you to head on over.


I have used the image Kit Kite Valentine and Heart Digital Papers from Pinksy Doodles. Please visit the Etsy store for an ever expanding range of papers, images and some fabulous SVG cut files that make me wish I had one of those fancy machines......


I used Sketch 492 from Try Stamping on Tuesdays for the layout and roughly designed my card on scrap paper before organising what I wanted to print out.


I printed the heart digital paper onto some glossy photo paper, it really makes the colours pop. I used 2 of the papers so I could add a contrasting strip.

The little kitty has been coloured with Promarkers and I used my Arteza coloured pencils to add some shading. The balloon has been covered with Glossy Accents and I added Glamour Dust glitter to this so it really sparkles. I fussy cut the image and added some sparkly gems to the cushion. This has been popped up on some thin foam squares.


The You Make My Heart Happy die cut sentiment is from Crafter's Companion. You get all the dies needed to create the layout and once I had decided what papers I was using I could cut the hearts out using the matching papers. I added double sided tape onto the back of the black cardstock before cutting the letters out which is so much easier than glueing the letters after they have been cut.

I added a strip of my absolute favourite ribbon to the underside of the pink central panel. I bought quite a big roll of it from Ebay years ago and have used it for so many cards over the years.

The sketch has 3 little dots on the bottom left so I used one of the rubber stamps from the Always & Forever set from Uniko and added some tiny red gems to either side. There seemed too much blank space above the sentiment so I cut a scalloped heart using an old punch from Woodware.


I had lots of scraps of the papers left so I decided to decorate the inside too. The central focus is the sentiment stamp from You Are Sentiments Outlined from Uniko. I had seen reference to this phrase at different times over the years but did not know where it originated. I really like to watch programmes on my Ipad when I am cooking and crafting and I am currently watching Grey's Anatomy and now know it is from this series. My husband is 'My Person' and has been for nearly 32 years so it is perfect for him.

I layered the papers together using Woodware punches to add a little more interest.

I am a full on romantic. I always say I live in a heart shaped world. You know some people see faces in images and everyday scenarios well I see hearts in all sorts of patterns and I truly believe that is because I have been in love with my husband for so many years. I know I am extremely lucky, he truly makes my heart happy just like it says on the front of this card.

I wish everyone who visits my blog lots of love and happiness and hope you are as happy as I am.

Card Details -


Size - A5

Digital Image - Kit Kite Valentine (Pinksy Doodles)

Digital Paper - Hearts (Pinksy Doodles)

Dies - You Make My Heart Happy (Crafter’s Companion)

Punches - Scallop Heart (Woodware) Heart Corner (Woodware)

Rubber StampsAlways & Forever (Uniko), You Are Sentiments Outlined (Uniko)

Inkpad - Versafine Onyx Black

Colouring Medium - Promarkers, Arteza coloured pencils, white gel pen

Embellishments - Glossy Accents, Glamour Dust, Docrafts self adhesive gems


I would like to enter this card into the following challenges (in Alphabetical Order)


Friday, 5 February 2021

Floral Heart Birthday


I recently took part in a Win It Wednesday giveaway over on the Uniko blog and the prize was 3 sets of Love themed stamps. One of my absolute crafting heroes Hannelie Bester from Desert Diva is a brand ambassador for them and had made some really lovely cards with them. I very rarely take part in those kind of giveaways but I am really glad I did as I only went and won! Just look at the beautiful Happy Mail I received yesterday and a lovely little note from Bev ☺


The set I have used today is Always and Forever. I really liked the heart with the flower in as I knew I had the perfect paper to go with it. Now I am not the best of stampers so was a little nervous of the solid background not stamping but my Tim Holtz stamping platform came through once again. I have to say that it has improved my stamping abilities no end and I get much better results than ever before so may crack open my stamps more now instead of using so many digistamps. Now I can use both!

Uniko is celebrating their 9th Birthday which is no mean feat especially with how the pandemic has affected businesses over the last year. 

Imagine That Digistamp is also celebrating a birthday and has been going for 8 years now. I used to be on her design team back in the early days and she has always created some of the nicest images and papers. Over the years many digistamp artists have come and gone but I am very happy that Kris is still creating and it is a testament to her great designs and talent. 

In honour of the special birthday challenges both are running I have created a birthday card combining the prompt of ribbon or bows and a birthday card.

The card blank has been covered using a speciality paper from a really old DCWV pad Bella Boutique. The cream background is flocked and then the floral design is added on top and that is also flocked. I love the texture of it but it's one of those papers that is really too nice to actually use.... I am sure you all have something like that in your stash.

The ribbon is velvet with the pattern printed on top. It has very fine glitter in the pattern and adds a little bit of sparkle.

I stamped the heart onto cream card using a Versafine ink pad. This was cut into a circle and I used a small ink pad to soften the edge. I then used a scallop edge circle die to create a mat from black pearlescent card.

The sentiment has been recycled from an old birthday card and then matted onto a scrap of the black. Finally I added a bit more twinkle with a couple of self adhesive gems.

Card Details -

Size – 6” Square
Rubber Stamp Image Always & Forever (Uniko)
Dies – Crea-Nest-Lies XXL 69 Circle Open Scallop (CREAlies)
Paper – Bella Boutique Stack (DCWV)
Stamp Ink – Versafine Onyx Black 
Embellishments – Ribbon, gems


I would like to enter this card into the following challenges (in Alphabetical Order)
 

Monday, 7 September 2020

Round of Golf


Today is my Father In Law's birthday and inspired by a pop up snowman card I had seen online I thought I would make a pop up golf ball. Little did I realise what I was letting myself in for though.....

I started off making the golf ball. I found a template online to make the ball and made it out of white card. I used 200 gsm and it seemed too thin so I did a slightly smaller version in thicker card. This still seemed too thin. I tried to use an elastic band to do the pop up bit but it ripped the card so I used some elastic instead and this seemed to hold up better.

To emulate the texture of the golf ball I used an embossing folder and cut the panels slightly smaller than the template, then taped them on with strong red liner double sided tape. After some manipulation I realised the joints would not hold very well especially where the sides were held together with the elastic so I ended up having to do some more strengthening. I was losing the will to live by this stage and seriously considered binning the blooming thing! I decided it was as good as I was going to be able to get it and stop messing with it.


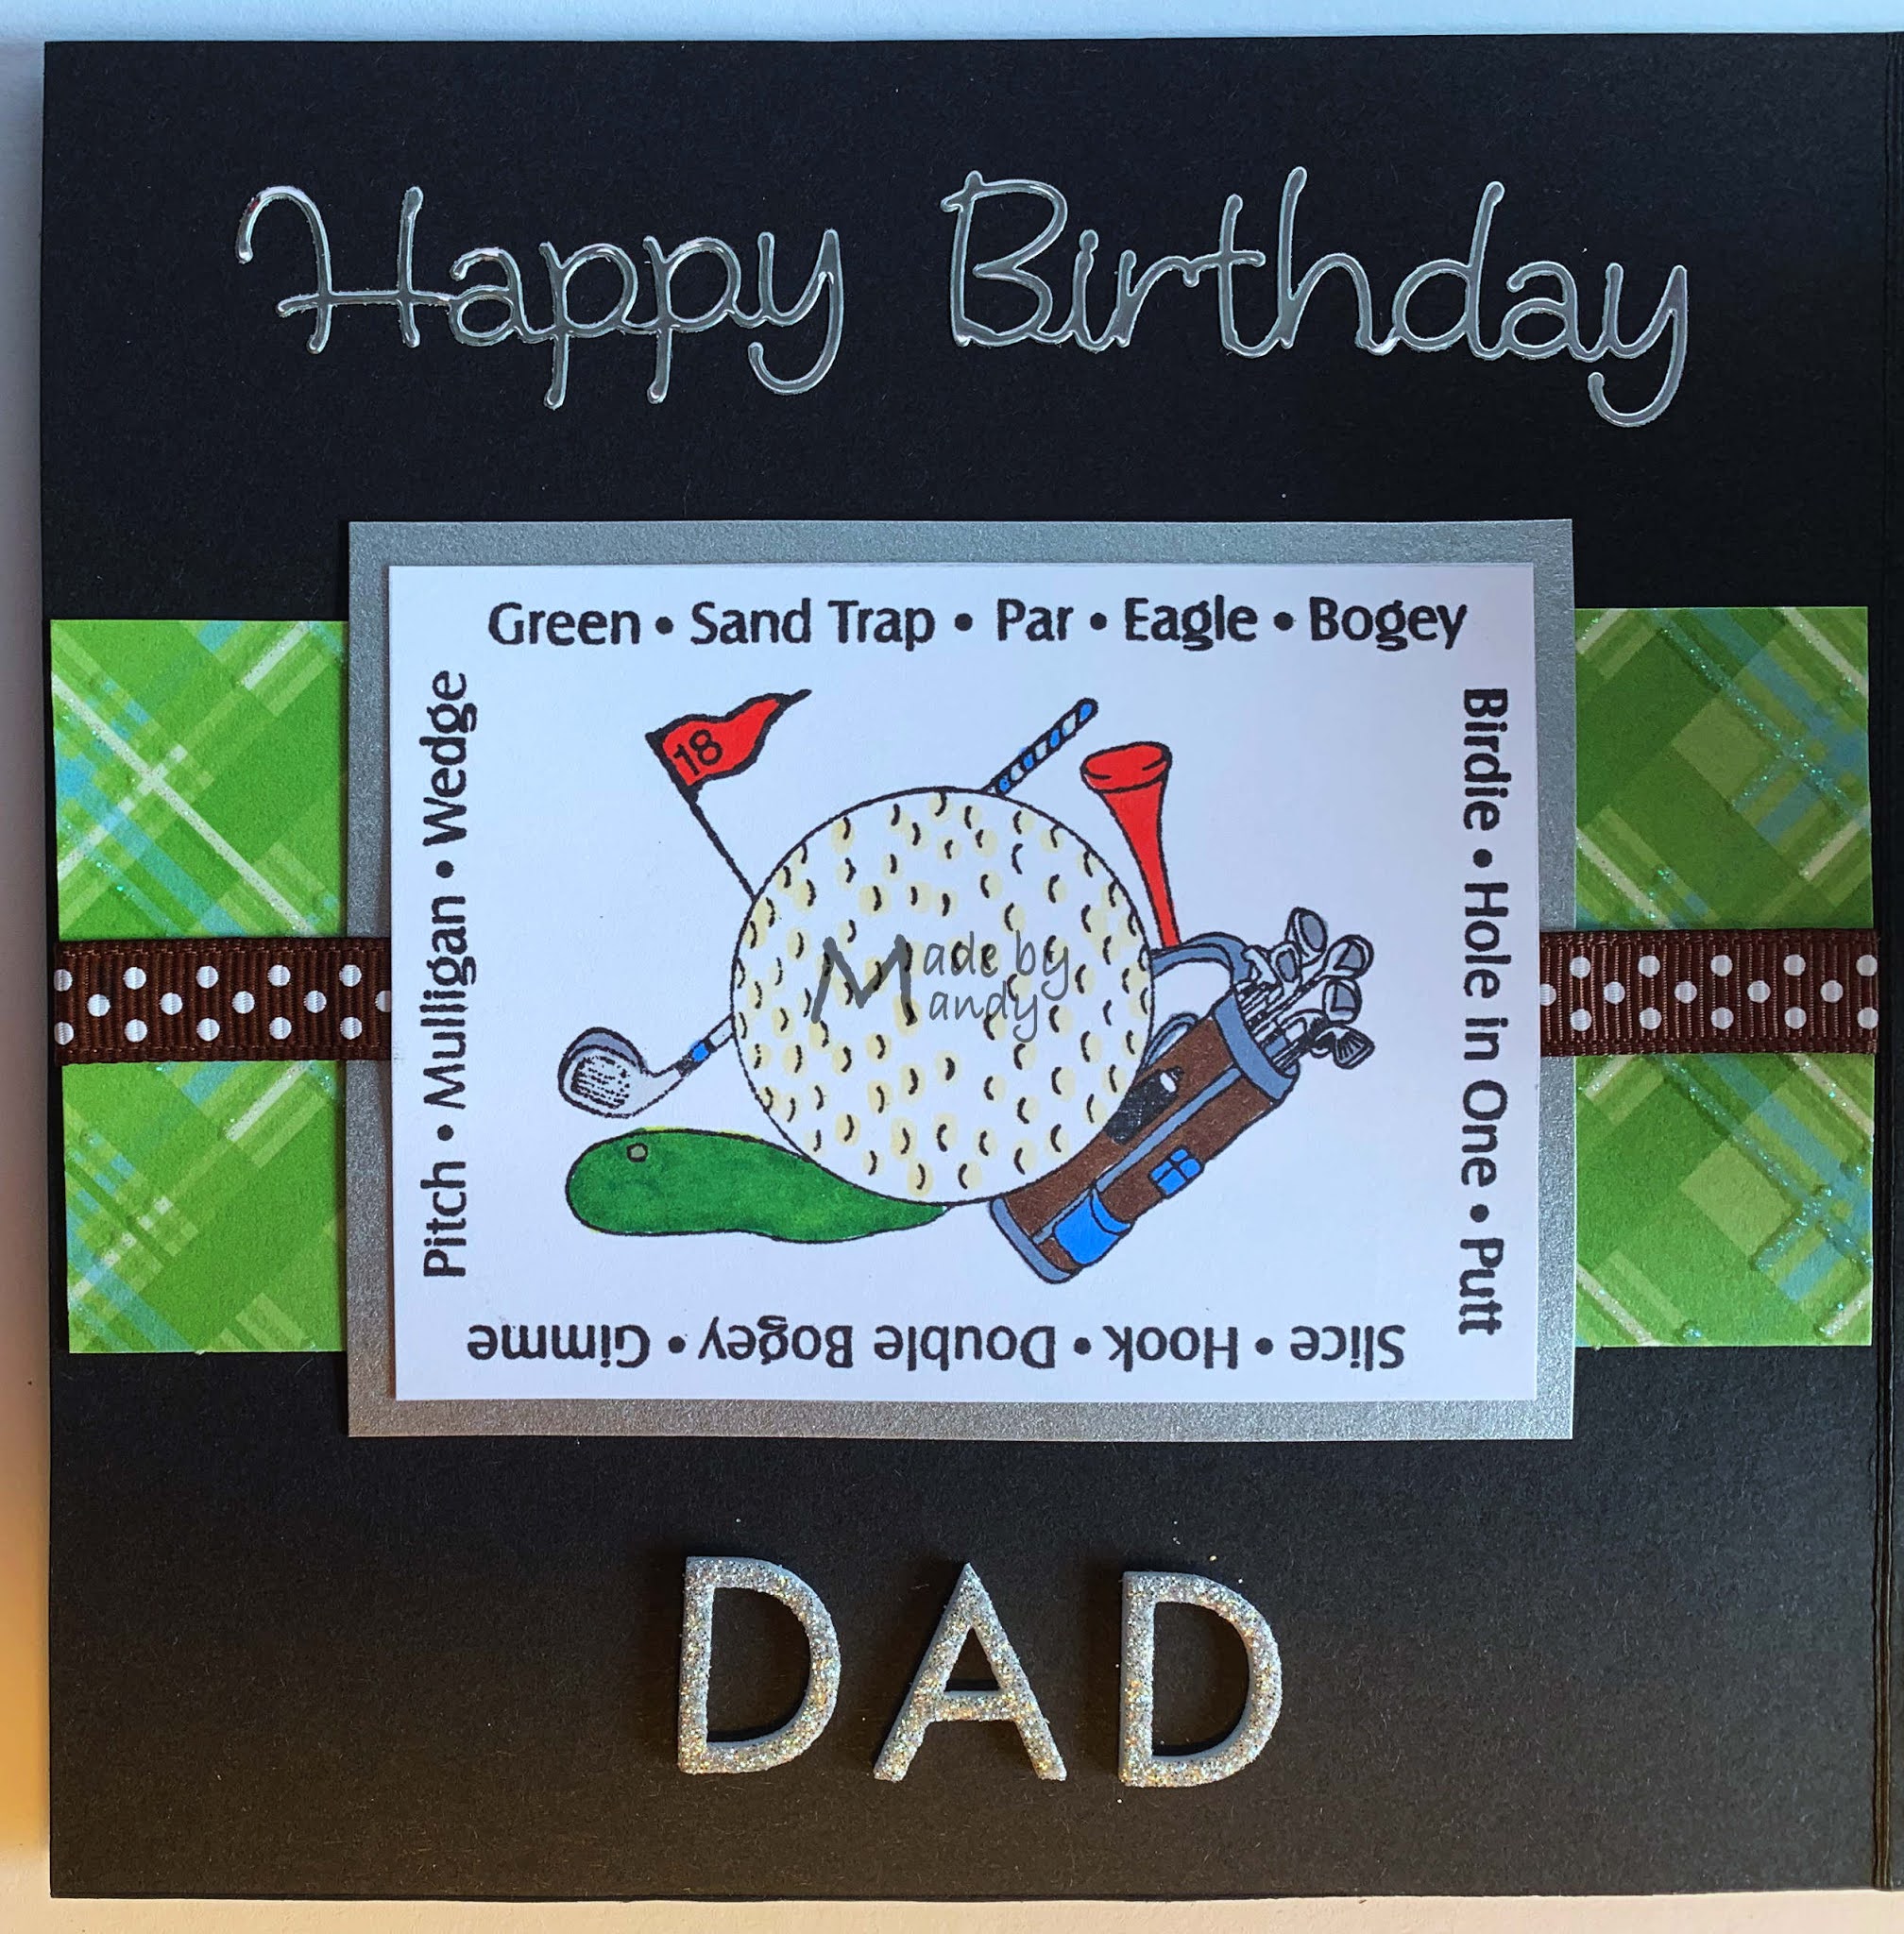
I was lucky to win a challenge recently and the prize was a gift certificate for DRS Designs. They had some lovely rubber stamps and I chose this fabulous Golf Is…… image. I really liked the frame of golfing terms and thought it would be nice for Dad as he is golfing crazy.


I coloured the image with a combination of Promarkers and Spectrum Noir pens. I mounted this onto silver card and added some ribbon and a plaid glittery patterned paper in green.  I added some peel off stickers for the sentiment and some foam alphabet stickers that have silver glitter on them for Dad. This is the inside left hand side of card.

The pop up ball is on the right hand side of the inside. I added some handmade green paper which has a lovely texture for the 'grass' and a silver cardboard hole that the ball goes into. This is the side profile of it. It doesn't completely spring into a round shape. If I pulled the elastic tighter then it made the ball go a weird shape so I had to compromise.


This is what the inside looks like with both sides in view.


To keep the card closed in the envelope I realised that I needed to add a belly band to it. I used a cupcake die that I received in a mystery clearance bag from Crafter’s Companion. I cut it from black card and then added a layer of silver underneath it so it made it stronger and added contrast. Where the band is die cut was quite weak when the golf ball was pushing against it. I added some silver gel pen and clear glitter to the embossed detail in the cupcake.

The patterned paper has been cut using a die from Julie Hickey Designs.

I was quite pleased with it once I had finished with it. I'm not sure what I was doing wrong or why I couldn't get a good balance with making it springy and tearing the card but I managed it in the end with some perseverance and a lot of swearing...... I just hope he likes it :)

Card Details -


Size – 6” x 6"

Rubber StampGolf Is…… by DRS Designs

Dies Sweet Treat by Crafter’s Companion, Square Layers, Frames & Banners by Julie Hickey Designs

Embossing Folder – Tiny Bubbles by Cuttlebug

Colouring Medium – Promarkers & Spectrum Noir, silver gel pen and sakura clear glitter pen

Embellishments - Ribbons, Peel off stickers, Foam glitter stickers


I would like to enter this card into the following challenges (in Alphabetical Order)