Tuesday 28 September 2021

Happy Birthday Cats


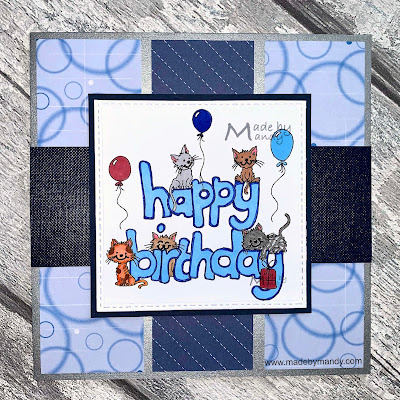
I was the recent winner of a challenge and won some images from Hetty Clare Art. I chose this cute image Happy Birthday Cats as I didn't really have many cat images and this seemed like a really useful one to have.

I started a new job 4 weeks ago and little did I know that it would be perfect for a work colleague who happens to have have his birthday today, the very same day as my own. I had to make a card for my birthday twin and he has 9 cats so this was the ideal image.

I used the latest sketch from Cheerful Sketch challenge for the basis if my layout. I used artistic license to change the central circle motif into a square. I wasn't sure if this was allowed but someone else has done it  so hoped it would be okay.


The image has been coloured with Promarkers and I used some fine liner pens from The Works for the fine details. I stuck mainly to a blue colour scheme throughout and chose papers from my scraps. The card base is a silver 6" x 6".

I used a square die to cut the image which has a stitched effect. This was part of a set of 8 nesting dies which I have bought from Ebay last week. I have a particular project in mind for them but tested the first cut on this image. It's quite crisp so I am looking forward to trying the rest of them out.

I gave him the card today and he was really impressed with it and that it had been made by me especially for him. I get so much pleasure from being able to make something that is really personal for the recipient. Spreading a little joy one card at a time

Card Details -


Size - 6” x 6”

Digital Image - Happy Birthday Cats (Hetty Clare Art)

Dies - Stitched squares (generic dies from Ebay)

Colouring Medium - Promarkers, Fine Liner Pens (The Works)

Designer Papers - All From scraps box Blue Stripe (HOTP) 


I would like to enter this card into the following challenges (in Alphabetical Order)


Monday 27 September 2021

Meerkat Birthday


Imagine That Digistamp has given us this great set to play with the Meerkats as the Digi of the Month for September. It is a progressive image challenge and as long as you take part with the image for that month you will automatically get the following one. Kris has shaken it up this month by giving each participant different parts of the set so we get to make lots of different cards this time round.


I have been given the Meerkat birthday image and a number of sentiments. This image was perfect for me to make a birthday card which I have given to my next door neighbour for his birthday today.

I have coloured the image with Promarkers and used some star shaped peel off stickers to decorate the balloon. The image has been matted with scraps of blue and holographic silver card from my offcuts. 

The base of the card is a dark blue with a silver stardust effect. The background has been in my scraps since December 2009 !!! I made a card back then using 2 of the papers in a quadrant effect and kept the other 2 pieces with the intention of making another card with them at a later point. They were already taped together ready to mount and I never ended up using it. Over time the double sided tape ended up losing it's sticky. I knew it was a few years and found the post for the original card on my old blog. You can see it HERE if you are interested. I was gobsmacked it was so long ago to be honest.

I used a thin metallic washi tape to add a bit of sparkle and cover the joins in the papers. I rarely use washi tape as I don't find it sticks very well so I added a thin double sided tape to the back and that has held it a lot better. Also I find wrapping the ends underneath stops it coming loose too and I am much happier with the results.

Finally I added a sentiment with some silver peel off stickers and a few little stars.

Kris really does design some fabulous kits and the Digi of the Month challenges are a great way to build up your collection. If you don't take part I would highly recommend you get involved.


Card Details -


Size - A5

Digital Image - Meerkats (Imagine That Digistamp)

Designer Paper - Cupcake 12x12” (Basic Grey)

Colouring Medium - Promarkers

Embellishments - Peel off Stickers, Washi Tape (The Works)


I would like to enter this card into the following challenges (in Alphabetical Order)


Sunday 26 September 2021

Tink's Birthday


Our Brother in Law to be shares his birthday the same day as mine. He got together with my sister in law during lockdown and this is the first birthday card I have made him so of course it had to be a bit special didn't it....😉

He particularly loves hares so I used that as my starting point for this card.

We had a combined birthday family meal yesterday and he opened his card then and loved it and how personal it was to him. I call that a result !

I had an email from Craftworld with a free template for a Corner Fold Up Card which I have seen around blogland but not previously made. I thought it might make a nice 'scene' type of card so had a practice on scrap paper and it is so easy to make this style of card.


I started with some brown card for the base. I have several of the coloured card pads from Lidl and they are slightly bigger than an A4 sheet of card. You use a square as your base and this worked out to a 5'5". I tried using a 12"x12" kraft cardstock but it was a bit flimsy and I am much happier with this base. The colour is much better as well so happy accident ☺

The sentiment section has a piece of fern paper which is from a 4" square pad of paper Inspiring Nature from 
. The sentiment is a die from there and I added a glittery owl and some leaves.


The 'hares' are rabbit dies from a set called Winter Wildlife Embellishments from the Paper Boutique. I cut 2 sets out using the 'wrong side' for one of them so I could create a mirror image on the card. I used dark brown for the background layer and the inside of a Weetabix box for the foreground. Pencils were used to add some shading details and gel pens for the eyes. The leaves paper in the background is from an old Papermania pad Woodland Folk. I added some more of the glitter leaves and some trees that were with the owl. It has a lovely Autumn feel to this card, perfect for an Autumn birthday.


This is what it looks like when opened out. I added some velcro dots to secure the bottom together when it stands up. I have seen a recent tutorial at Beccy's Place that used magnets hidden underneath the layers of paper. I didn't have any so used what I already had to hand.


Card Details -


Size - 5.5” Corner Fold Up Card

Dies - Happy Birthday (The Works), Winter Wildlife Embellishments (The Paper Boutique)

Designer Papers - Inspiring Nature (The WorksWoodland Folk (Papermania)

Colouring Medium - Arteza Expert Pencils

Embellishments - Glitter Owls & Trees (Poundland) Glitter Leaves (The Works), 


I would like to enter this card into the following challenges (in Alphabetical Order)


Tuesday 21 September 2021

Christmas Sweaters Snowman


At Kate Hadfield Designs there are so many fabulous sets it is really easy to get inspired to use them. There are digital stamps which you can colour, coloured doodes you can scrapbook or make into digital layouts. Papers, patterned overlays and doodles galore. No matter what your skill level there are so many goodies to play with. 

One of the most fabulous things about being in this Creative Team is that we have free rein to make anything we want to using the sets in the shop. This is amazing for inspiring creativity as there are so many amazing packs to play with. I feel very, very lucky to be able to have this opportunity. 


Anyone who is a regular visitor to my blog know that I LOVE making Christmas cards. I love using this set of Christmas Sweaters Stamps and made a completely different sweater shaped card with it before which you can see here. This time I used the snowman image as the main focus of my card.


I used the current sketch from the Outlawz Wednesday Sketch Challenge for the layout. My card is A5 in size and I used papers from a 12" paper pad to cover the card and the text strip on the side. I added a super glittery ribbon in a nice rich blue.

The image has been coloured with Promarkers and I added some Sakura clear glitter pen for the 'snowball' spots on the sweater background. The image and edges of the card have been distressed with a small black inkpad. This is a really old one that is almost dry so perfect for using for distressing.


The sentiment is a very old freebie from Tlc Creations. I have always thought it would be perfect for a snowman image. As many people think Christmas sweaters are not 'cool' then it's quite humorous too . The sentiment has been cut using the Nesting Ovals Cookie Cutter dies from Quickutz. This die set has been in my collection for many years and is perfect for sentiment panels. It is matted onto a scrap of blue card.

As a final touch I added a padded fabric snowflake which is holographic and a big blue gem from Paperchase.

Over at Kate Hadfield Designs there is lots going on. Kate is really generous with her freebies which are readily available. If you sign up to the newsletter you get access to an extra subscriber area the Doodle Den where there are loads more freebies. There is a gallery full of projects by the Creative Team and customers and so much inspiration for crafters and teachers. I would highly recommend you pop over there and join in the fun.

Card Details -


Size - A5

Digital Image - Christmas Sweater Stamps (Kate Hadfield Design)

Digital Sentiment - Old Freebie from Tlc Creations

Paper - Merry Christmas (Craft Sensations)

Dies - Nesting Oval Tracks Cookie Cutter (Quickutz)

Colouring Medium - Promarkers, Sakura Clear glitter pen

Embellishments - Glitter ribbon, holographic fabric snowflake, large gem


I would like to enter this card into the following challenges (in Alphabetical Order)

Wednesday 15 September 2021

Gingerbread House


Over at The 12 Months of Christmas Link Up it is the midway point of our challenge. That means it is the turn of the Merry Maidens to share some more fabulous Christmas cards


This paper pack Embossed Metallic Christmas Edition designed by Decosse's Dynamite Doodles is up for grabs to the lucky winner who follows the optional twist to feature Something Metallic on your card.


The Sponsor for this challenge is Beccy's Place who is offering the fabulous prize of $10 to spend in her store.


For my card I have used an image from one of the sets on my wishlist from Beccy's store Gingerbread Set. I adore the gingerbread house and knew it would look lovely if I decoupaged it to create multiple layers and highlight the intricate details. The whole set can be purchased from Beccy's Place store for $10 HERE


I started with a sheet of gold A4 pearl card for the base. On this is a layer of brown card and then the gingerbread paper from the Christmas Confectionery Patterned Papers set from Decosse's Dynamite Doodles. The great thing about digital files is that you can play about with the sizing and placement to fit your project. This is a real advantage when you have a motif that you can be certain fits into the size and shape of your project. No one wants to cut through the body of a gingerbread man!


I isolated one of each motif from the paper and enlarged them so they could be added as embellishments. Lisa's files are always really good quality and high resolution so they are perfect for this and a great way for you to stretch your supplies. Good quality digital papers easily allow you to expand your creativity in this way.

The gingerbread house is made up of 3 layers. The bottom layer is the full image. The next layer up is the whole roof and chimney. The final layer is the roof trim and the window shutters. All layers have been coloured using Promarkers.  They have been fussy cut with my trusty Fiskars embroidery scissors. These were a VERY expensive purchase when I first started making cards but allow me to cut very neatly and have lasted over 20 years. They only need sharpening every now and again by cutting through several layers of kitchen foil and they are as good as new. They have definitely been worth the initial outlay. 

The layers have been put together with some thin foam pads. Of course I have had to add lots of stickles glitter glue and some red gems. I added this to some brown cardstock and trimmed close to the image. This slight contrast gave a better separation from the element and the gingerbread paper.

I also added the trimmed gingerbread figures to card in the same way. Used a black fineliner to add some eyes and some red gems for the buttons.

The sentiment is one I created myself using a font that came in a special font package my hubby bought me from Serif who are the creators of the digital software I use:- Affinity Photo and Affinity Designer. 

I have included the png and jpg files below. You are very welcome to download these and use in your creations. If you do use them please do not claim as your own. It would be smashing if you send me a link to anything you make with my freebies and I can pop over and leave you some love.


For the gold metallic sentiment mat I have used one of my fave dies from Crafter's Companion Grace Frame. This was my very first die from CC and must be about 17 or so years old. I love how intricate the border is an it is a decent size so perfect for framing a larger sentiment panel.

All in all I am really pleased with this card. Beccy's image has turned out exactly as I had hoped and Lisa's gingerbread paper is the perfect combination to make a super yummy Christmas card that is good enough to eat.

I do hope you will take part in our challenge and look forward to seeing your creations.

Card Details -


Size - A5

Digital Image - Gingerbread Digital Stamps (Beccy’s Place)

Digital Paper - Christmas Confectionery (Decosse’s Dynamite Doodles)

Digital Sentiment - Freebie Made by Mandy

Dies - Grace Frame (Die’sire /Crafter’s Companion)

Colouring Medium - Promarkers

Embellishments - Gems, Stickles Glitter Glue


I would like to enter this card into the following challenges (in Alphabetical Order)