Friday 24 May 2019

Birthday Elephant


I made this birthday card for my sister in law who loved elephants. The image is Critter Balloon Elephant from Bugaboo Digi Stamps.

I used the latest Stella Says Sketch from the Catch the Bug Challenge as the layout.


The image was coloured with Promarkers and Flexmarkers with a 2nd decoupage layer on the head/trunk and balloon. I added a Spectrum Noir clear glitter pen onto the balloon.

The image was die cut with Spellbinders Nestabilities Reverse Wonky Rectangles and layered onto gold mirri card. All the papers have come from my scraps drawers and have been distressed with an ink pad on the edges.

The sentiment banner and heart have been die cut from plain card and gold mirror card and then I have added gold peel offs.

Finally inspired by the Crash Your Stash challenge over at The Outlawz I added some googly eyes.  


Materials Used in this Project are as follows:- 

Card Size - A5
Dies - Spellbinders Nestabilities, Stitched Hearts, Stitched Banners form Ebay
Tools - Promarkers & Flexmarkers, Spectrum Noir clear glitter pen
Embellishments - Peel off stickers, googly eyes
Techniques - Decoupage, Die Cutting

I would like to enter this card into the following challenges (in Alphabetical Order):-


Wednesday 22 May 2019

Tea Time Thankyou


One of Paul's work colleagues is from Sri Lanka and recently went to visit family over there.

He brought a gift in for Paul of some Ceylon tea. He is not keen on tea but I love it. I had never had Ceylon tea before but found it was absolutely gorgeous. Such a fresh clean taste and completely different to my favourite Yorkshire tea.

Of course I dis some research and found it is not easy to get Ceylon tea in the UK and you certainly cannot get the plantation fresh Zesta. It looks like I might be able to get some from Whittard though so will pop in there when I next go to Birmingham shopping.

However, Sanjeewa surprised me by giving a second box of tea to Paul for me. I was so blown away by this lovely gesture from someone I have not personally met that I wanted to make a card to show my gratitude.

I had my car serviced last week and popped to The Range and found this little teapot die for only £1 so that was a perfect starting point.


I used the May sketch from STAMPlorations as inspiration for the layout although I didn't have enough space to get the layout quite on point. Hope you will forgive me for using a bit of artistic license

The card base is covered with some red spotty card which has been recycled from an old Christmas card. This was actually the inside of a card...... too good to waste in the recycling bin so recycled in my craft drawer instead. I have distressed the outside edge with an almost dry mini ink pad. I'm not really one for the grungy look but find this helps to knock harsh edges back a little.

The square white panels have been cut using a Spellbinders Nestabilities die from the Lacy Squares set. I drew around the inside of the frame with a gold gel pen. The Teapot is an Xcut Dinky die. I cut 1 out in red and another in a dark green to provide the contrast for the hearts. The etched lines on the teapot lid have been highlighted with a white gel pen and a Sakura clear glitter pen has been used on the hearts.

The second panel is embellished with one of the tags from the tea making it completely personal to the recipient. The third panel has a chipboard teacup embellishment from my stash.

I used a rubber stamp from Hero Arts for the sentiment. This was printed onto plain white card, coloured tea brown with a Flexmarker and the added a red glitter gel pen. This was then fussy cut an all panels mounted onto 3d foam squares. Finally a bit of bling added to the corners as it looked a bit too CAS for me....

The recipient loved his card and that makes me very happy.

Materials Used in this Project are as follows:- 
Card size – 6" x 4"
Paper – Recycled card from an old Christmas card
Die Cut - Teapot XCut Dinky Die (only £1)
Sentiment – Hero Arts Sentiment cling rubberstamp CG132
Tools – Rubber stamps, gel pens, Flexmarker, self-adhesive gems
Techniques – Rubber Stamping, Fussy Cut

I would like to enter this card into the following challenges (in Alphabetical Order):-


Friday 17 May 2019

Ikea Hack - Epic Pen Storage!


I had a bit of an epiphany a few nights ago when I experimented with 2 of the Ikea Ordning cutlery stands.

I thought they might make a good way of storing pens. I have had my Promarkers in a box standing on end for years and all of a sudden they have started to dry up. I thought it best to store them on their side to protect my investment and was racking my brains to come up with an affordable solution.

I had 2 already in my craft room so emptied them out and grabbed some cable ties from my hubby's stash.  


The stands are perfect for linking together with cable ties as they are drilled in regular places. Thus making them easy to link together in a configuration to suit your space. The above image shows how the cable tie was linked through each of the centre holes. The tie was then looped back through the bottom, pulled tight and cut off.


The picture above shows how the cable tie is looped through the holes on both cutlery stands. Once these are pulled tight with the ratchet nature of the cable tie it is tremendously sturdy.


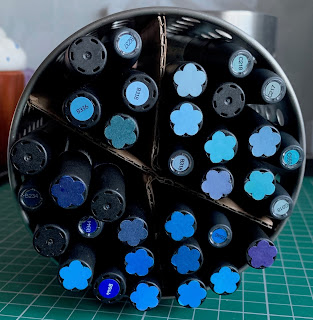
This is what it looked like on it's side. I experimented with putting Promarkers inside with and without a cardboard divider. I could get easily 30 pens inside each one.

I decided I liked it better without the divider though.....


I went to Ikea on Wednesday to get 14 more. I had decided to do a display of 4 rows with 4 in each row for a total of 16 pots.

I started off making a row of 4, simply cable tie-ing each one together as the first example. As they are drilled in the same places on opposite sides of the cylinder this made it so very easy to link together in a uniform way.


Once you have as many rows as you need you simply need to link them together.

 Initially I preferred the idea of making them 4 regular rows sitting on top of one another like a Connect 4 grid. 


Offsetting them as in the finished image below proved to be much sturdier though. However it does mess with my sense of equilibrium as it is not centralised so rows 1 and 3 may be amended to 5 on each row on my next visit to Ikea. The the utter beauty of this system is that the stands are only £2 each so completely affordable. It is easily expandable so can be added to as your needs change.

When laying one row on top of each other you just need to cable tie through the corresponding holes. I made it really sturdy by adding them in the centre line of each pot where it touched the next one. I figured it would make it super strong so if I need to move it for any reason it will be a sturdy structure in it's own right. Please see below image of finished empty structure to see how the cable ties intersect from one pot to the one it touches.


Then finally I got to fill it. I have a small flower punch that I use to cut from the cardstock from Ryman that I print my digital images onto. This allows me to stick to the end of the pen and colour it in. I can then see the colour it will come out on my paper as it is not always the same as on the barrel. 

Over the years I have collected the full set of Promarkers and Flexmarkers. I wanted to separate them into colour families and then give me extra space to put my Sharpies, Sakura gel pens, other metallic pens and paint markers. I also have a pot which has got just normal pens in.

The pots cost me a grand total of £32 plus about a £1 for the cable ties. 

In comparison to store this many pens in the Crafter's Companion Ultimate pen storage black trays would have been around £100 more than that. Money I would much rather spend on supplies than storage.


I am sharing this idea with my fellow crafters as it might be suitable for your space too. I would very much appreciate it if you would credit me and link back to my blog if you do use this idea.


Saturday 11 May 2019

Happy Anniversary


This card has been made using a free image Valentine Derek which is from the monthly Outlawz Progressive Freebie challenge. This has been kindly donated from Dr. Digis House of Stamps.

I coloured Derek with Promarkers and Flexmarkers and fussy cut with my beloved tiny Fiskars scissors. They are so precise and perfect for cutting out tiny details.

I used a shaped card template which is free at Cuddly Buddly Crafts. The finished size is 13.5cm square so I sized the image to 9.5cm to fit the height in the centee of the top heart layer.

After cutting all the layers from the template the only thing left was to add a sentiment. I am planning to give this to my beloved.

My hubby and I have been together 30 years in July. We are going on a cruise through the Norwegian Fjords, onto Iceland and then stopping off in Dublin on the way back to Southampton. Hubby was 50 in December and this was a present for his birthday as he wants to go to Iceland. The added bonus is that we will be on the ship for our anniversary which makes it all the more timely.

It is not our wedding anniversary then as he 'road tested' me for 13 years before we tied the knot in Las Vegas on my 30th birthday which was in September.

Materials Used in this Project are as follows:- 
Card Size - 13.5cm
Image Valentine Derek by Dr. Digis House of Stamps
Sentiment - Kanban
Tools - Promarkers & Flexmarkers
Techniques - Fussy Cutting, Shaped Card


I would like to enter this card into the following challenges (in Alphabetical Order):-