I had a bit of an epiphany a few nights ago when I experimented with 2 of the Ikea Ordning cutlery stands.
I thought they might make a good way of storing pens. I have had my Promarkers in a box standing on end for years and all of a sudden they have started to dry up. I thought it best to store them on their side to protect my investment and was racking my brains to come up with an affordable solution.
I had 2 already in my craft room so emptied them out and grabbed some cable ties from my hubby's stash.
The stands are perfect for linking together with cable ties as they are drilled in regular places. Thus making them easy to link together in a configuration to suit your space. The above image shows how the cable tie was linked through each of the centre holes. The tie was then looped back through the bottom, pulled tight and cut off.
The picture above shows how the cable tie is looped through the holes on both cutlery stands. Once these are pulled tight with the ratchet nature of the cable tie it is tremendously sturdy.
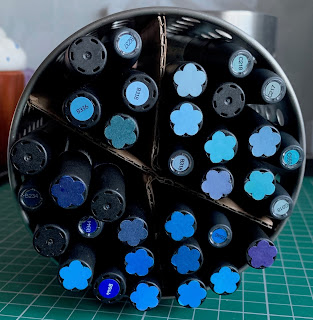
This is what it looked like on it's side. I experimented with putting Promarkers inside with and without a cardboard divider. I could get easily 30 pens inside each one.
I decided I liked it better without the divider though.....
I went to Ikea on Wednesday to get 14 more. I had decided to do a display of 4 rows with 4 in each row for a total of 16 pots.
I started off making a row of 4, simply cable tie-ing each one together as the first example. As they are drilled in the same places on opposite sides of the cylinder this made it so very easy to link together in a uniform way.
Once you have as many rows as you need you simply need to link them together.
Initially I preferred the idea of making them 4 regular rows sitting on top of one another like a Connect 4 grid.
Offsetting them as in the finished image below proved to be much sturdier though. However it does mess with my sense of equilibrium as it is not centralised so rows 1 and 3 may be amended to 5 on each row on my next visit to Ikea. The the utter beauty of this system is that the stands are only £2 each so completely affordable. It is easily expandable so can be added to as your needs change.
When laying one row on top of each other you just need to cable tie through the corresponding holes. I made it really sturdy by adding them in the centre line of each pot where it touched the next one. I figured it would make it super strong so if I need to move it for any reason it will be a sturdy structure in it's own right. Please see below image of finished empty structure to see how the cable ties intersect from one pot to the one it touches.
Then finally I got to fill it. I have a small flower punch that I use to cut from the cardstock from Ryman that I print my digital images onto. This allows me to stick to the end of the pen and colour it in. I can then see the colour it will come out on my paper as it is not always the same as on the barrel.
Over the years I have collected the full set of Promarkers and Flexmarkers. I wanted to separate them into colour families and then give me extra space to put my Sharpies, Sakura gel pens, other metallic pens and paint markers. I also have a pot which has got just normal pens in.
The pots cost me a grand total of £32 plus about a £1 for the cable ties.
In comparison to store this many pens in the Crafter's Companion Ultimate pen storage black trays would have been around £100 more than that. Money I would much rather spend on supplies than storage.
I am sharing this idea with my fellow crafters as it might be suitable for your space too. I would very much appreciate it if you would credit me and link back to my blog if you do use this idea.


Brilliant idea! I have the Crafter's Companion storage trays, and while I can see all of my pens and they are organized, it can take a bit of time to put them all back in their respective slots. Wonderful design and love the idea that it can grow easily if you need it to!
ReplyDelete