Pages

Friday, 30 April 2021

Teacup Bunny


Imagine That Digistamp have a Progressive Challenge each month. 
If you completed a card using the Digi of the Month you automatically get the following month emailed to you. If not you can purchase that stamp for a reduced price.

The set we have been given to play with for April is Teacup Bunny. You get this cute image in outline and colour plus 6 sentiments which can be easily mixed and matched with other projects.


I coloured the image with Promarkers and added shading with Arteza coloured pencils. This was then cut out using a die cut frame with scallop edges. I used an almost dry black inkpad to distress the edges.

The paper background is actually the contact sheet for a Papermania paper collection. I had cut the mini papers up into strips 2.5cm tall and created a patchwork effect background paper. This was then matted onto some black paper and added to the pink card blank. I thought this was a great way to recycle something that would otherwise have not been used.


Finally the sentiment is a Craftwork Cards due cut that has been added to the striped paper and again matted with black paper.

I love the facial expression on this little bunny and it has made such a sweet birthday card.


Card Details -


Size - 4.5” x 6.5”

Digital Image - Teacup Bunny (Imagine That Digistamp)

Dies - Crea-Nest-Lies XXL 70 (Crealies)

Colouring Medium - Promarkers, Arteza Expert pencils

Paper - Pink Capsule Collection (Papermania)


I would like to enter this card into the following challenges (in Alphabetical Order)


Thursday, 29 April 2021

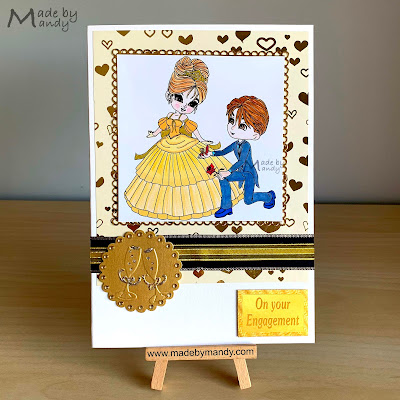
The Proposal


Stamper's Delights holds a Progressive Freebie challenge on Facebook every month. If you make a card with any of their images then the following month you can request that set for free. I love Janice's images and you get lots of images and sentiments when you take part so it is a win win.

My Sister in Law has just got engaged and this was the perfect excuse to make a card using The Proposal which is an older image from Stamper's Delights and no longer on the website.

I have coloured using Promarkers and pencils for shading and hair details. The colours of blue and yellow have special significance for them so I used them as the main colours and gold as the metallic accent.

The heart paper is a wrapping paper from Paperchase. They have so many lovely papers that are really thick quality. For £1 tor £2 you get the equivalent of 8 sheets os A4 paper so they are fantastic value..

The mat behind the image is from a set of dies that have 12 nested scalloped edge squares that range in size from 2.5cm to 13.5cm so are really handy. Not many go up to the larger sizes.

I used the latest sketch 909 from Stella Says Sketch for the layout.


The ribbon is actually 2 ribbons on top of one another. The sentiment is a metallic Dufex one that has been in my stash forever. The champagne glasses is a mini embossing folder from Cuttlebug which has been cut using a Spellbinders scallop edge die. I embellished this with some gems and Stickles glitter glue. Finally I added a gem to the ring in the image as it had to be a big sparkly one.

It was nice to make a card for such a happy occasion and the both loved it.

Card Details -


Size - A5

Digital Image - The Proposal (Stamper’s Delights)

Dies -  Crea-Nest-Lies XXL 70 (Crealies), Classic Small Scallop Nestabilities (Spellbinders)

Embossing Folder - Wedding Mini Folders (Cuttlebug)

Paper - Wrapping paper from Paperchase

Sentiment - Dufex

Colouring Medium - Promarkers, Arteza Pencils, Gold Gel Pen

Embellishments - Ribbon, self adhesive gems, Stickles glitter glue


I would like to enter this card into the following challenges (in Alphabetical Order)


Friday, 23 April 2021

Hip Hip Hipster Shoe


At Kate Hadfield Designs there are so many fabulous sets it is really easy to get inspired to use them. There are digital stamps which you can colour, coloured versions you can scrapbook or make into digital layouts. Papers, patterned overlays and doodles galore. No matter what your skill level there are so many goodies to play with.


I love the shoe in this set of Hip Hip Hipster Stamps. When I was a teenager my parents had very little money and I often had hand me down clothes and shoes. MY very first pair of sneakers were in this style and they were bought for ME. Not hand me downs but my very own shoes for ME and they were branded Le Coq Sportif. I thought I looked the bees knees in them and this stamp totally reminded me of these shoes. I loved those shoes and they lasted me years.

I don't often make male cards as we have so many women in the family. If I am making a card 'just because' I tend to make more feminine cards but I am really making an effort to do more male cards. I thought this image would be perfect for this.


I made the stamp quite a large size and coloured it with Promarkers. I stuck it to some thick card to make it sturdy. Added a die cut star shape and dusted off my Cropodile and eyelets. I couldn't set the star shaped ones with this but I still have my old Fiskars spring loaded setting tools and they worked fine. Shaped ones I always seem to have issues with so I am really glad I never got rid of them when I bought the 'must have' Cropodile Big Bite (they are both very, very old tools. I bet many people don't use them anymore!)

Once the eyelets were set I threaded some silver metallic ribbon through to make super cool laces. This whole shape is popped up on foam squares to accommodate the bulk that the laces and eyelets take up at the back.

I had stuck to a very simple colour scheme of red, white and blue for the show so used these for matting and layering. The star paper I think is from a big pack of very old papers from Docrafts/Papermania and I always find stars useful for male cards.

The sentiment is a digital Freebie from Desert Diva  Hannelie has a huge selection of sentiments on her blog and is so generous with them. I have often used them over the years. She has a fantastic CAS style of card making that I really admire. If you are not already aware of her you really need to go check her blog out. She has been on many great companies design teams over the years and is a great ambassador for anyone she creates for. Hop on over there, give her some love and check out her free sentiments.

The sentiment has been matted onto layers of card and all have been cut using the petite Label 1 dies from the Spellbinders D Lites range. They have been so useful over the years for smaller sentiments.

I am really pleased with how this turned out. I just love seeing an image, it sparking an idea and then when it comes out even better than you hoped it makes me so happy. I have found that the freedom to make what I want without constraint and with so many resources to be able to play with has sparked my creativity so much.

Over at Kate Hadfield Designs there is lots going on. Kate is really generous with her freebies which are readily available. If you sign up to the newsletter you get access to an extra subscriber area the Doodle Den where there are loads more freebies. There is a gallery full of projects by the Creative Team and customers and so much inspiration for crafters and teachers. I would highly recommend you pop over there and join in the fun.

Card Details -


Size - A5

Digital Image - Shoe 3 from Hip Hip Hipster Stamps (Kate Hadfield Designs)

Digital Sentiment - Freebie 821 (Desert Diva)

Dies - Stitched Star (Ebay) & Petite Labels 1 (Spellbinders D Lites)

Colouring Medium - Promarkers

Embellishments - Eyelets, ribbon


I would like to enter this card into the following challenges (in Alphabetical Order)


Monday, 19 April 2021

Streetly Walking Market


Our Local area had 3 Walking Markets last year. I wasn't aware of the first 2. 
The third in December I walked around following the map and went to streets I hadn't been to before.

They were asking people to sign up to it and a friend had suggested I should do it last time. I have major confidence issues which only seem to get worse as I get older so I really didn't know if I could do it. 2 weeks ago I took the plunge and signed up...... GULP

The idea is you have a table at the end of your drive and it was from 10am to 2pm so not too long.

I had a lot of cards I had already made but they had no inserts, needed labels, bags and header cards so there was a lot of work that had to be done to get them ready for sale. There was lots of printing with leaflets for the table, smaller ones to go inside each card and then I did a leaflet drop on our street the night before. 

The weather was glorious (sunburnt with factor 30 on!) and the footfall wasn't particularly good. Might have been to do with it being a Sunday, rather good weather and the last day before kids went back to school. However it was a great experience for me as I was able to gauge the interest, see if my prices were okay, what sizes sell best that sort of thing.

Very importantly my contact details are out there for potential commissions. I added this to the Facebook page for the event and of course on all the leaflets. People were ver complimentary about my cards and how my display looked, professional packaging so I achieved what I set out to do.

The absolute best thing though is my little sister, who I have not seen since January 2020 came to visit me as a complete surprise. She lives 1.5 hours drive away and as lockdowns and UK travel restrictions have not allowed us to go out of our local area we have been unable to see one another. She works at a care home and has had to be very careful.

There I was chatting to a good neighbour and showing her my cards and up rocks my sister and brother in law. I cried like an absolute baby, I was literally a blubbering wreck. We are not supposed to hug people but there was absolutely no way that wasn't going to happen (she's had both jabs due to her job and has to test every shift and I have had my first so I consider that to have been a good assessment of risk)


I am the one in the colourful top and she was taking the mickey out of me as I am so much shorter than her and with grey hair..... This was about 5 minutes after she got there and I was still crying. She had seen my post on Facebook and came to buy a card. Honestly the best surprise ever. I knew I missed her but it wasn't until I saw her I realised just how much. The rest of the time passed in a blur!

The lady who has organised it said she wants to do one in September and another early December. After my experience this time I definitely would take part again. I met some lovely people and it wasn't as scary as I thought it would be.

Thursday, 15 April 2021

Retro Santa Claus


Over at The 12 Months of Christmas Link Up it is the Merry Maidens turn to showcase some fabulous Christmas cards.


This paper pack Miscellaneous Christmas Red & Gold designed by Decosse's Dynamite Doodles is up for grabs to the lucky winner who follows the Optional Twist if you use the  colours of Red & Gold as the focus of your card. 


This paper pack is gorgeous so you really want to win this one.

The Sponsor for this challenge is Taylormadecards4U who is offering a $10 certificate for digital items from the store.


This card has been made 100% fully digital as my printer seems to have a hard time with printing lots of red without it looking streaky. I will sure be glad when worldwide shipping and distribution gets back to normal as anything technological seems to be out of stock. The colour inkjet printers that are available are either cheap and nasty or way too high spec and overpriced for our needs. Every good one hubby looks at is out of stock and no one has details of when due back in. Hopefully as the world starts getting back to some sort of normality availability will improve.

The image set I chose is Retro Santa Claus as I particularly wanted to use the December 25 and Santa checking his list image.


I started by cropping the images from the sheet. I used the Amber paper from Foil Textures Festive Colours for matting and layering throughout.


This paper was the perfect compliment from my favourite patterned paper from the Miscellaneous Christmas Red & Gold set. The holly is so sophisticated.


I used a sketch from Sweet Sketch Wednesday 2 for the layout and stretched it to make suitable for a rectangular card.


I made a ribbon using the Crumpled Chrome 1 paper and used a snowflake brad from the Snow Much Fun pack. I use these brads and snowflakes often in digital layouts as they are so handy.


The sentiment is from Holiday Hoopla Word Art Collection. I layered this onto some of the holly paper and used a gausian blur effect so it gives you the mottled background. I am loving playing with these digital effects.

I do hope you will take part in our challenge and look forward to seeing your creations.


Digital Card Details -


Size - A5

Digital Images - Retro Santa Claus Pack from Taylormadecards 4U

Digital Sentiment - Holiday Hoopla Word Art Collection (Decosse's Dynamite Doodles)

Digital Paper - Miscellaneous Christmas Red & Gold, Foil Textures Festive Colours, Crumpled Chrome 1   (Decosse's Dynamite Doodles)


I would like to enter this card into the following challenges (in Alphabetical Order)


Monday, 12 April 2021

Make The Cards Featured Creator


I was recently a Featured Creator at Make The Cards Challenge with my Easter card and invited to be a Guest Design Team Member on the new challenge starting today which is to use Butterflies on your card.


Well any regular visitor to my blog knows I love me some butterflies.  I have many, many dies and stamps and countless papers of every colour so this was a very easy challenge for me.

For this card I just had to use my favourite butterfly die which is Statement Butterfly from Crafter’s Companion. It is quite a large size and definitely makes a statement.  There are 3 layers to it which you can use independently or combine them together as I have done here. The bottom layer is solid lighter blue cardstock, middle layer is navy cardstock and the top layer is an iridescent paper which I have added colour with a Distress ink pad. I like to leave the layers separated so you create lift and dimension.

I used a sheet of A4 navy card for the base and added some pretty blue paper which was a magazine freebie. The Intricate Lace Frame die from Crafter’s Companion cuts this beautiful delicate frame which is so pretty. The inside of this has been used as a mat for the sentiment which is a digi from a retired company McMahon Five Designs. I made a series of cards last year using this sentiment and butterfly with lots of different colour variations. It is particularly useful to cheer people up and spread hope in the dark days we have all experienced over the last year. 

I do hope you will pop over to the challenge blog and 'Make The Card' with a beautiful butterfly.

Card Details -


Size - A5

Dies - Statement Butterfly & Intricate Lace Frame (Crafter’s Companion)

Digital Sentiment - McMahon Five Designs (Retired)

Colouring Medium - Tim Holtz Distress Ink Pad Denim

Embellishments - stick on gems


I would like to enter this card into the following challenges (in Alphabetical Order)


Wednesday, 7 April 2021

Lulu With Daffodil


It is time for another challenge over at The Paper Funday.
Our challenges are always Anything Goes with an optional twist. 
The twist this time is the theme 'Spring Has Sprung'


We are very fortunate to have 2 sponsors for each challenge this year which means we get to choose which artist we would like to work with. This really is great as it gives us double the choice. We are very lucky with the amazing sponsors that are lined up this year, many of which are old favourites and some are new to me.


I chose to work with this cute image Lulu With Daffodil from Paper Nest Dolls. I have been lucky to work with a number of Christine's images recently and I adore the sweet expressions on their faces.


I used this image to make a centrepiece in a card I was making for my Mother in Law's birthday. I have seen some wreath cards on my blog travels and thought it might make a colourful and different card for my Mother in Law. This year her birthday was the day before Mother's Day so the pressure was on to make not one but 2 spectacular cards for her.... the pressure is real people.

The base of the card is a sheet of green adorable scorable card from Hunkydory. It is a 350gsm good weight of card which was perfect for this as I wasn't sure if the flowers would make it top heavy. I experimented with the size of circle and made them 6.5 circumference in the centre and 8cm on the outside. I knew that compass I had kept in my stash would come in handy one day! I cut this from heavy weight card to provide a good solid base for the flowers. Once I had my circle I could then use this to cut the green card to match the shape and size. I then added some floral patterned paper and a matching white border.

The flowers are a mixture of pre-bought paper ones and then ones cut from flower forming foam using dies. There are some paper daffodils that I bought from Ebay a million years ago along with some fabric ones. I embellished with some gems and flower stamens. I can't lie, this took ages to put them together.

The Happy Birthday sentiment is a really ornate die from Crafter's Companion. I also used a butterfly die from Sizzix. I drew around the outside to create a solid mat in green and cut this with scissors. I added a flower stamen for the antenna and some small gems for the body. The 2 smaller butterflies are 3d stickers that came in a kit from QVC many years ago.


At this point the initial card was done and then I had the idea to use the image and make it into a spinner card. I wasn't completely happy with one of the flowers as it seemed too bright an orange compared to the other so I swapped this out and I am now much happier with the result.

I coloured Lulu with Promarkers and added some metallic highlights with a glitter marker from Spectrum Noir. I added some shading to the hair with Arteza pencils. The image has been coloured the same twice so I could use them back to back. I die cut them using a pretty scallop edge frame. I then added some clear thread in between and then fixed this to the top and bottom of the circle.

This is like nothing I have ever made before and was a real labour of love. My MIL loves my cards though so it is worth the effort for her.

I hope you will join myself and our fabulous team over at The Paper Funday

Card Details -


Size - 8” x 9.5”

Image - Lulu With Daffodil (Paper Nest Dolls)

Dies - Floral Wreath (Sizzix Thinlits), Box Large Die (Crafter’s Companion), Petite Posies (Crafter’s Companion) Clover (Crafter’s Companion) Happy Birthday Sentiment (Crafter’s Companion), Just a Note Butterflies (Sizzix). Crea-Nest-Lies XXL69 Dies (Crea-lies) Colouring Medium - Promarkers & Spectrum Noir Glitter Markers

Embellishments - Autumn Hues & Floral Bouquet Flower Forming Foam, Stamens, Paper Flowers, Paper Daffodils, fabric, self adhesive gems, Butterfly 3D Stickers, Clear thread


I would like to enter this card into the following challenges (in Alphabetical Order)